A network drive is also known as a mapped drive. It refers to a drive on another computer or server, which is connected to your computer through a local network connection. For example, many of us have the experience to work with the corporate network. In such a network system, many computers are connected to the main server. Some computers also remain connected to each other for sharing data. Transferring data from one computer to another computer becomes simpler with network mapping. How to map a network drive Windows 10? In this article, the steps will be discussed in detail.
What Is Network Drive?
As stated above, a network drive means a shared drive on a network. For understanding the basics of a network drive, you can consider an example of a corporate network. In a typical corporate network, the server computer can access all the computers in the network. But, other computers have restricted access to the server. For example, only customer information drive on the server may be shared on the network. This drive can be referred to as the network drive. Computers attached to a network can access the drive of the server anytime for seeking information.
Mapping network drive has its benefits and shortcomings. You can find the list of the benefits of mapping a network drive in the following section.
Files stored on the network drive can be shared with many people. So, it acts as a communicating platform between multiple computers.
Permission for accessing the information on a network drive can be restricted for the users. Some users may be allowed to view files only. They cannot edit or delete files.
It gets easier to take a backup of important data through a network drive. Since it acts as a centralized platform, different computers can keep a backup of the data on this drive.
SAN and NAS can turn to add storage easier for the users.
So, what are the shortcomings of the network drive? In the following section, you can find a list of shortcomings.
For creating a network drive, it is important to create a corporate network. Creating such a network is a costly affair.
Confidential data may not remain safe on the network drive.
Accidental modification or deletion may happen on a network drive. As a result, you may lose crucial information.
Read more:
How To Factory Reset Windows 10
What Is the Need for Mapping Network Drive?
Network drive mapping is required for many reasons. In the following section, the reasons for mapping network drives have been listed.
Easy Access to Crucial Information: Network drive mapping helps computer users to access information easily. Network drive becomes a centralized platform. Hence, it is easy to get files stored on the drive from different computers.
Consistency: The work process in an office can become faster and more accurate with advanced network mapping. Accessing a mapped drive does not take time. It is simple. Hence, communication between different business departments becomes seamless and consistent.
Network Setup: Network drive is needed for a network setup. If you want to create a network, there must be multiple computers. The main computer is known as the server computer. The other computers will be attached to the server through a robust network connection.
These are some of the common reasons why a network drive is required. The basic purpose of creating a network drive is to create a shared drive between multiple computer users on a network.
How to map a network drive windows 10?
Windows users can easily create a shortcut to another drive or folder on a shared network by mapping the network location. Clicking on the shortcut will help the computer users to reach the shared folder. Users can view files and folders in the shared folder. So, how to map a network drive Windows 10? In the following section, you can find the steps to set up a network drive.

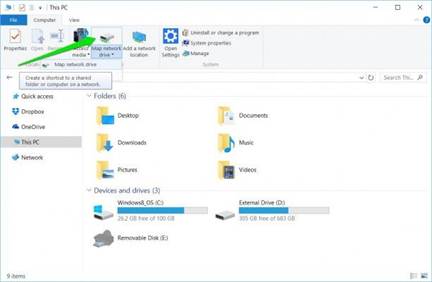
At first, you need to turn on your computer. After turning the computer on, you need to open File Explorer. From File Explorer, you need to select “This PC”.
At the top, you shall find a ribbon menu. From that menu bar, you need to click on the “Map Network Drive Drop-Down”. This is a default option for Windows 10 users. Hence, you should not find any trouble in finding the option.

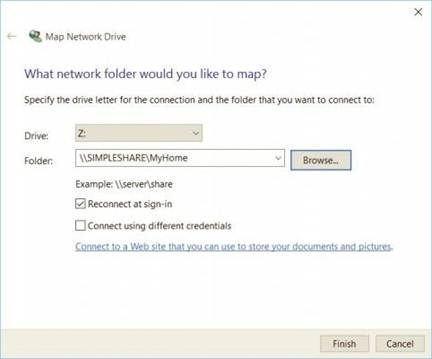
The next step is to select the drive you want. You can choose any drive on your system for the network folder. After selecting the drive, you need to click on “Browse”.

At this point, many users may get an error message. Why this error message appears? It happens due to the inactive network discovery. You need to turn on the network discovery to make it active. For activating the network discovery, you need to follow the steps mentioned below.
Open the control panel of your Windows 10 computer.
Under the control panel, you shall find an option named “network and sharing center”.
Under the “Network and Sharing Center”, you need to choose the advanced sharing settings. The advanced sharing settings can be found at the top-left corner.
The next step is to turn on network discovery. Once you turn it on, you need to click on “save changes” to save your settings for the future.

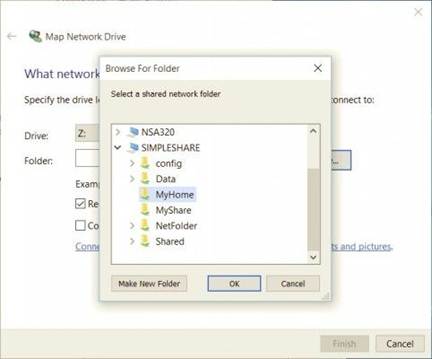
The next step is to “Navigate to the Folder”. You need to select the folder that you want to map. Once you have selected the folder, you need to hit “OK”.
In the next step, you need to confirm your selection by clicking on the “Finish” button. Every time you sign in, you can try to reconnect the folder. This will help the folder to stay always available. If needed, you can use a different account to connect the folder.
When you have finished the steps mentioned above, you shall find a new drive letter on your PC. You can access the content of the drive anytime.
Users can disconnect the network drive if they want. For disconnecting, you need to select the drive and right-click on it. From the drop-down menu, you need to click the option named ”Disconnect”.

